Chapter Two: Studio Gear
5. Signal Processing (Effects)
Below are some basic signal processing effects found in most studios and home audio editing software. More than likely, composers will now be using effects as plug-ins in a DAW rather than sending signals out to outboard effects devices. But these concepts apply to both.
Wet/Dry Mix
Most signal processing units or software have a wet/dry mix to set the balance between the source (dry) and effected (wet) signals. For effects like a single echo, you will definitely want to hear both the dry and wet sound. For an effect like pitch shift, a totally wet sound will output only the new pitch and not the original. If you are using an aux send to feed a separate effects channel, as opposed to having your effect inline in the input channel, you will more often than not leave the wet/dry mix on the effect at 100% wet, since you can control the ratio from your channel's aux send pot (see Channel Aux Sends).
Latency
When combining pre-recorded tracks with live sound input that is routed through digital plug-ins or outboard digital effects, an undesirable delay called latency may become noticeable. Latency comes mainly from buffering: the computer collects audio samples in blocks, called buffers, before processing them, and some plug-ins add a delay of their own. Usually this is a small, unnoticeable delay. At 48 kHz, for example, a 256-sample buffer adds about 5.3 ms in each direction. Some DAW programs, like Digital Performer, have automatic latency compensation: even though you may hear a slight delay while recording, the program shifts the new track into alignment, but of course that won't help with live processed performance. Many audio interfaces also offer direct monitoring, which sends the live input straight to your headphones before it reaches the computer, with no latency, though you then hear it without the plug-in effects. A possible fix for excessive latency would be to reduce the effect buffer size or the DAW buffer size, but this is not always possible, and when it is, too small a buffer can overload the processor and cause clicks and dropouts.
Reverb
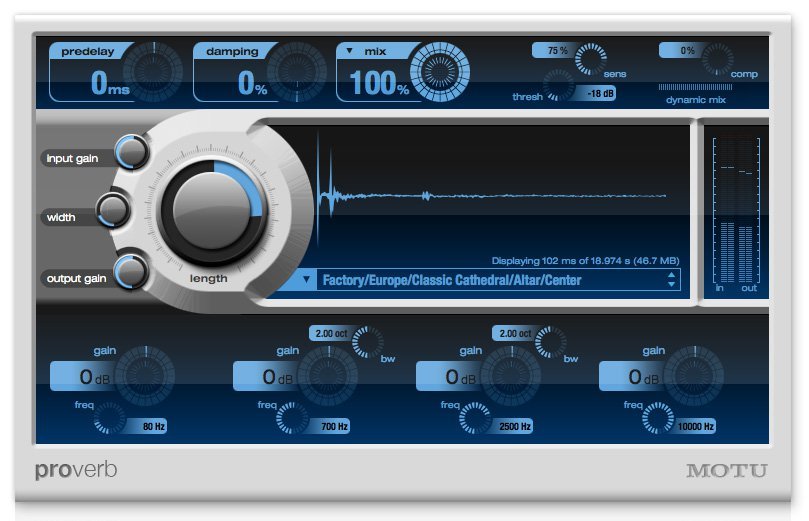
MOTU's ProVerb, the convolution reverb included with Digital Performer. The display shows the first 102 ms of the loaded impulse response, a cathedral recorded from the altar, whose full length is nearly 19 seconds. Several of the controls defined below are here: predelay, damping, the wet/dry mix and the large length knob, with a four-band EQ along the bottom. Screenshot from MOTU's Creative Music Production plug-ins page.
As discussed in the previous Acoustics chapter, reverberation or reverb is the prolongation of sound waves via repeated reflections. While it may occur continuously during the course of a sonic event, it is most noticeable and measurable after the source impulse has ended. Reverb is distinguishable from simple multiple echoes, such as shouting into a canyon might produce, by the rapid build-up of reflective density to the point where individual reflections can no longer be told apart. Reverb is created naturally in an enclosed environment, but can also be created artificially through electronic means. A more extensive description of natural and artificial reverb and the different types can be found on the Acoustics chapter's reverberation page. Some items are repeated below.
A few practical tips for reverb use: As with the delay effect below, or in fact anything that extends the sound beyond the end of a sound file, it is extremely important not to cut off the soft ending of the reverb (called the reverb tail) when editing or bouncing. It is recommended you extend your bounce selection well beyond the audible end of the reverb and then trim back after bouncing; zooming in on the waveform and raising the audio monitor level will help you find where the tail really ends. What might not be an audible untimely end to your reverb tail in the studio may be very apparent in a concert hall. In addition, the composer is encouraged to use reverb sparingly, if at all, as an insert on individual tracks, and instead to use effects sends to feed the source channels to a single reverb on an aux track. Reverb tends to multiply exponentially, and once bounced, is virtually impossible to reduce once better judgment sets in. The main reason to put reverb on an individual track is that it needs settings very different from the other tracks. Choose stereo reverb plug-ins for both mono and stereo tracks (on a mono track, a mono-in, stereo-out version), since the differences between a reverb's left and right outputs are much of what makes it sound spacious. And finally, for effect chains, it is most common to put the reverb effect last.
Controls: reverb time (or impulse response length for convolution reverb), pre-delay (time before onset of reverb), high-pass filter (HPF), low-pass filter (LPF), stereo difference, diffusion, damping, color. Convolution reverbs, which use impulse response (IR) files, build several of these parameters into the IR itself, so you change them simply by choosing a different IR.
Level in decibels against time; on this scale the steady decay of the late reverberation is a straight line.
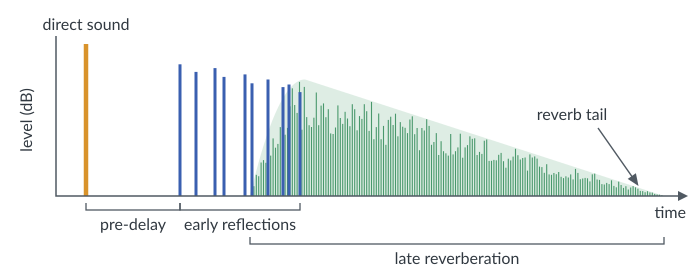
Anatomy of reverberation. The direct sound arrives first. After the pre-delay come the early reflections, distinct enough to count, which thicken into the dense late reverberation as more and more reflections pile up. The late reverberation then dies away steadily, and its quiet final stretch is the reverb tail.
A Few Definitions for Less Obvious Reverb Controls
Here are some of the more esoteric controls you are likely to encounter with artificial reverbs.
Pre-delay, as the name implies, is a gap in time between the direct sound and the onset of the reverb reflections. It gives the listener a cue as to the size of an artificial environment. A longer gap before the early reflections indicates a larger environment.
Diffusion, often a setting on reverb units, refers to how much sound is scattered as it reflects off a surface. For a perfectly reflective surface, sound will reflect with one coherent phase. However, less perfect surfaces (or deliberately imperfect surfaces, such as acoustic diffuser treatments) will return the incident wave to the listener with multiple reflections out of phase with each other, much as a frosted light bulb scatters light (think light diffuser). The acoustic result for the composer is that a higher setting for reverb diffusion shortens the space between the early reflections and creates a denser, smoother sound early on. With diffusion set to zero, early reflections may sound discrete and separate, more like echoes, depending on their spacing and amplitude settings.
Damping, another parameter often found on reverb units, controls how much more quickly the high frequencies die away than the low ones, something we use as an aural cue for the size of a space in addition to the first return of reflections. Damping also helps the user zero in on the desired impression of room materials, such as curtains and carpets, which absorb more high-frequency energy than low. A concert hall or football stadium will have a higher degree of damping than a small studio with hard, reflective walls. In the Concert Hall example below, with 25% damping, listen for the high frequencies to decay more quickly.
On some reverbs, Color will regenerate some of the early reflections, where room modes or "color" are most discernible, into the late reverb, extending the initial room resonance.
Length parameters for convolution reverbs let the user "stretch" or "shrink" the IR, which effectively changes the size of the room slightly while keeping its basic character. This can help move troublesome resonance modes, particularly in the low range.
For further explanations of common reverb controls, as well as tips on how to effectively use them, see Craig Anderton's excellent article on the subject.
Reverb audio examples (all stereo)
Dry signal
Plate reverb “Announcer Booth” preset, 50% mix (subtle; compare to dry)
Medium room 95 ms pre-delay, 50% mix
Concert hall 3-second impulse, 25% damping, 50% mix
Equalization (EQ)
An equalizer can boost or cut certain frequency ranges, since it is made up of a series of peak/notch audio filters. The two main types of equalizers are graphic EQs and parametric EQs. Equalization, as the name might imply, was originally designed to correct the frequency response flaws of a transmission line or listening environment to create a more or less flat response to all frequencies after recording or during playback. In time, its use expanded to make things "better" than they once were (maybe heavier bass, or increased presence in the 2–5 kHz range). Additionally, EQ is used to create special effects and timbres, and may be used dynamically to alter timbre in real time. Common errors include boosting everything and cutting nothing, or boosting a band so much that the whole signal distorts whenever a strong component falls within it.
Graphic EQs
A 31-band graphic EQ, one fader per ⅓-octave band from 20 Hz to 20 kHz.
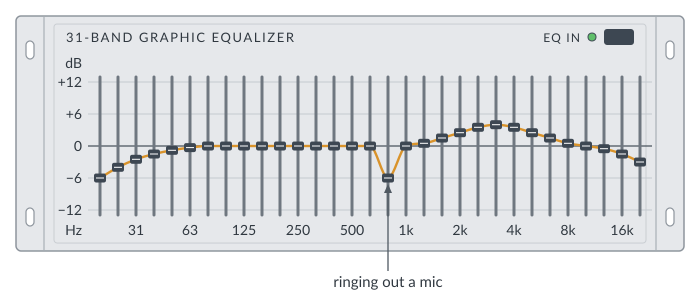
The fader positions draw a picture of the EQ curve (added here in orange; the hardware shows only the faders), which is where the graphic EQ gets its name. Here the low end rolls off gently, the presence range around 3 kHz is lifted, and one fader is pulled out of line: the narrow cut a sound engineer makes when ringing out a mic, taming the one frequency that feeds back first. Because neighboring bands overlap, the actual response is a little smoother than the picture.
Graphic EQs have a series of vertical faders, each controlling one band, with the bands spaced at equal musical intervals; the fader positions draw a picture of the EQ curve, which is where the name comes from. A good graphic EQ may have bands spaced every ⅓ octave (31 bands across the audible range). In their neutral central position, they neither boost nor cut frequencies, but as they are slid up or down, they can significantly boost or cut the part of the spectrum that falls within their band, typically by up to 12 or 15 dB on hardware units and more on some plug-ins (every 6 dB is a doubling of amplitude).
Parametric EQs
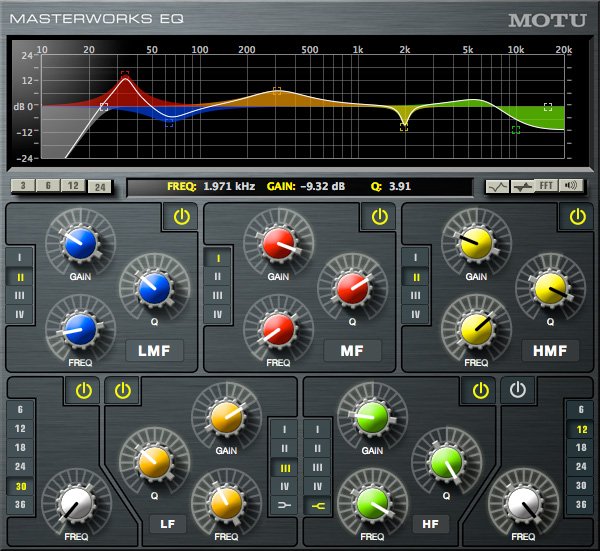
MOTU's MasterWorks EQ in Digital Performer: five fully parametric bands, each with its own GAIN, FREQ and Q, plus high- and low-pass filters at either end with slopes from 6 to 36 dB per octave. Screenshot from MOTU's MasterWorks EQ product page.
Parametric EQs, such as those discussed on the mixing console EQ page, have a series of peak/notch filters, meaning they can either boost or cut frequencies inside their tuned band. The user can usually control the center frequency of the band, the width of the band (Q) and the amount of boost or cut. A frequent mistake is sweeping the band's frequency while the boost/cut is set to zero, resulting in no change to the signal. The lowest and highest bands can often be switched to a shelving filter, which boosts or cuts everything below (low shelf) or above (high shelf) its corner frequency by the same amount. Many parametric EQs also have a high-pass filter at the low end and a low-pass filter at the high end, often with a choice of slope; unlike a shelf, their response keeps falling rather than leveling off.
EQ audio examples
Dry signal
3 kHz boost high-pass at 2 kHz
150 Hz boost 600 Hz cut
130 Hz boost low-pass at 440 Hz
Compression and Limiting
Output level against input level, both in decibels. The dashed diagonal is 1:1, where output equals input.

Four transfer functions. (1) With no compression, output equals input. (2) A 5:1 compressor with a −20 dB threshold passes softer levels unchanged and reduces everything above the threshold; the shaded wedge is the gain reduction. (3) The same compressor with 16 dB of makeup gain: the whole curve is lifted, so soft sounds come up while a full-scale input still comes out at 0 dB. (4) A limiter holds everything above its −10 dB threshold at the threshold.
Compression can be an extremely important and useful tool for an electronic composer. A compressor effect transforms the amplitude of an input signal in a non-linear fashion based on a compression ratio and a threshold, the level above which gain reduction begins. The bend in the response at the threshold is called the knee. While mixer faders or DAW volume curves either add to or subtract from a signal's gain linearly regardless of the input amplitude, compression most often passes lower amplitudes linearly, but gain-reduces or squashes the areas where the signal is at higher amplitudes, creating a deliberate reduction in dynamic range. A compression ratio setting determines the amount of compression above the threshold. A 5:1 compression ratio means that a signal that is 5 dB above the threshold going in will be reduced to 1 dB above the threshold going out. Compression at higher ratios may alter the timbre of a sound, giving it a "punchier" character when applied to sounds with sharp transients, such as kick drums or basses.
Normally, compression occurs when the level of the input signal itself rises above the threshold, but many compressors also offer the option to have the amplitude peaks of a different signal trigger the gain reduction, and this is called side-chain compression. A familiar use is ducking: a steady kick drum triggers compression on a sustained pad, so the pad dips on every beat and seems to breathe in time.
Each graph in the figure above is a transfer function: the x-axis is the level of the input signal and the y-axis is the level of the output signal, both in decibels, and the dashed diagonal marks where output equals input. With no compression (panel 1), levels pass linearly; that is, whatever level goes in is the level that comes out. Panel 2 shows that levels up to the −20 dB threshold are still passed linearly, but above it they are reduced at a 5:1 ratio; the shaded wedge shows the gain reduction. This lowers the overall level, and that may be useful in some circumstances.
However, compression is most often used not to reduce overall amplitude, though it can be very useful as part of noise reduction, but to do quite the opposite. Because compression has lowered the peaks, a control called makeup gain can then boost the entire signal, so the soft parts come up while the peaks stay below clipping. Panel 3 uses the same threshold and ratio as panel 2 and adds 16 dB of makeup gain, boosting the entire signal: a soft input at −40 dB now comes out at −24 dB, while a full-scale input at 0 dB still comes out at 0 dB. The advantage of using compression to do this is that it allows for the highest gain possible without clipping the higher amplitudes of the signal. In fact, if you looked at the waveforms of many pop, rock and hip-hop recordings from the 1990s and 2000s, they would look essentially like two horizontal 2 x 4s, with very few low-amplitude spots. And if you have ever wondered why you can still hear the TV commercials from the kitchen, even though you haven't touched the volume, it is because they are often heavily compressed.
Fooling Mother Nature comes at a cost, however, and extreme ratio compression suddenly kicking in and out can create unwanted artifacts—the most common are called pumping and breathing. Most compressors have attack and release settings that help with this by easing in and easing out the compression, rather than having it suddenly reduce a sharp transient. A slower attack also lets the start of each note through before the gain reduction takes hold, which is much of the “punch” compression can add. A release that is too fast causes a different problem on low notes: the compressor begins reacting to individual cycles of the waveform and distorts it, adding a buzz. Because even a fast attack can miss a sharp transient, better compressors also offer a function called look-ahead, which delays the audio slightly so the compressor can see peaks coming. Many also offer stereo linking, which applies the same gain reduction to both channels so the stereo image doesn't shift.
Panel 4 of the figure shows the action of a limiter. A limiter can be viewed as an extreme compressor: any signal that exceeds its threshold is held at the threshold, a ratio of ∞:1 (in practice, 20:1 or higher). Using a limiter to avoid clipping may at first look like a great idea. However, heavy limiting can significantly alter the character of a sound. In general, it may be better to use compression and good gain control, but a limiter has its uses as a failsafe last resort where unpredictable higher amplitudes simply need to be stopped, such as live sound reinforcement or protecting speakers. A limiter is also the usual last stage when mastering a finished mix. Its controls are similar to a compressor’s, minus the ratio; limiters used for mastering usually add a ceiling control, which sets the maximum output level, often about 1 dB below full scale.
Compression audio examples (bass line from Chic's “Good Times”)
Uncompressed
Compressed, no makeup gain 6:1 ratio
Compressed with makeup gain 6:1 ratio
Chorus
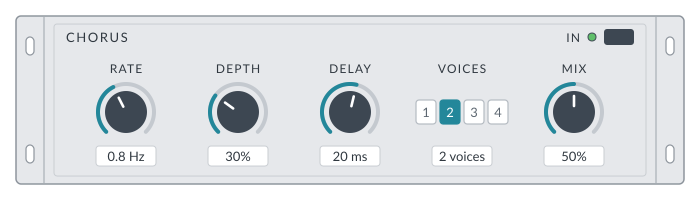
A generic chorus. The 20 ms delay sits in the chorus range, the LFO sweeps it slowly (0.8 Hz) by a moderate amount (depth 30%), and the Voices selector sets how many delayed copies are added.
A chorus effect adds one or more "voices" to a signal by mixing in copies that are delayed slightly (roughly 10–30 ms), with each copy's delay time slowly varied so that its pitch drifts just above and below the original. It is great for thickening sounds and, as the name implies, mimicking larger ensembles from a thinner sound source. Chorusers typically use one or more low-frequency oscillators (LFOs) to vary the delay, with the amount of pitch drift controlled by a depth parameter. A close relative, the doubler, adds a single copy with a slightly longer delay and little or no modulation, imitating a part recorded twice.
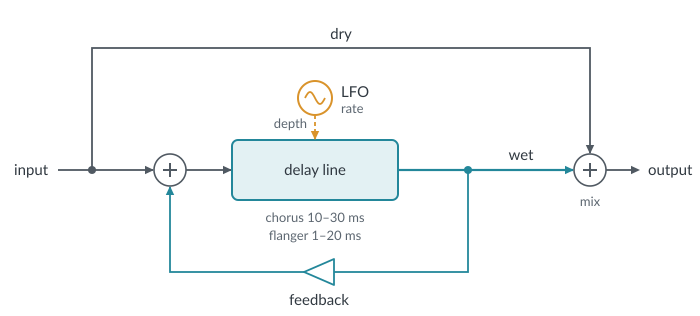
One machine, two effects. A copy of the input passes through a short delay line whose delay time is swept up and down by a low-frequency oscillator (LFO), then is mixed back with the dry signal. Part of the delayed signal can also be fed back into the delay. Chorus uses longer delays and little or no feedback, so the copies are heard as extra, slightly detuned voices. Flanging uses shorter delays, where the delayed copy combines with the original into a sweeping comb filter that feedback makes stronger.
Controls: LFO rate, depth, delay time, number of voices, mix. Depth sets how far the delay time, and with it the pitch, swings above and below the original.
Chorus audio examples
Dry signal
One added voice with delay
Two added voices with delay
Fast LFO, wide depth
Echo and Delay
Acoustically, an echo is a reflection that arrives late enough to be heard as a separate repetition of the sound—roughly 50 ms or more after the direct sound, or about 17 m (56 ft) of extra travel. Echoes in the physical world generally repeat with each subsequent repetition attenuated in amplitude, at a rate set by how much the reflecting surfaces absorb and how far the sound travels. In an environment where multiple surfaces exist, multiple echoes may form rhythmic patterns. Digital signal processing can not only reproduce the basic physical properties of echoes but also create artificial enhancements not found in nature, such as echoes that increase in amplitude over time, rhythmic patterns synchronized to other tracks, or an indefinite continuation of the echoes. Also unlikely in nature is the single, short-delay echo called a slapback echo, demonstrated below.
Back in the day, a technique for creating multiple echoes used tape recorders or dedicated tape-loop units such as the Echoplex, recording a signal with the record head, picking it up a moment later at the playback head, and feeding that back into the machine's input. The tape speed, together with the distance between the record and playback heads, determined the time between echoes, and the amount of attenuated signal sent back determined how long the echoes would continue. Now, however, almost every major DAW has DSP plug-ins called either echo, delay or multi-tap delay. Delay effects generally differ in use from reverbs in that the echo density does not build up to a single perceived late reverb entity, though many delays can mimic that. Individual echoes are referred to as taps. Delay settings can determine the number of taps, their delay times and their levels. In addition, most delays can feed the output echoes back into their inputs, a process called feedback, so even a single-tap echo setting can produce multiple echoes via feedback. Stereo or multichannel delays can have different delay times and levels for each channel or speaker, providing for a ping-pong effect if desired. The feedback level is normally set to less than unity gain, unless the user wishes the echoes to continue indefinitely or even increase in amplitude (eventually to clip and distort if not stopped).
Another parameter to pay attention to is the mix amount. If you have an inline delay in a channel strip and the delay mix is set to 100%, you will not hear the original sound, and with a single tap, the sound will simply arrive late rather than being heard as an echo. This may be useful for time-aligning live audio in a sound reinforcement situation. However, if you are busing your source signal to a delay on a dedicated aux track, then you will want to set the delay mix to 100% to nix the source sound in that aux. As with reverb, be very careful not to inadvertently cut off the end of the delay signal, which will likely extend beyond your source file. When selecting a region to bounce, be certain it extends far enough for the delay signal to die away completely.
Tap times match the Mono multi-tap example below.
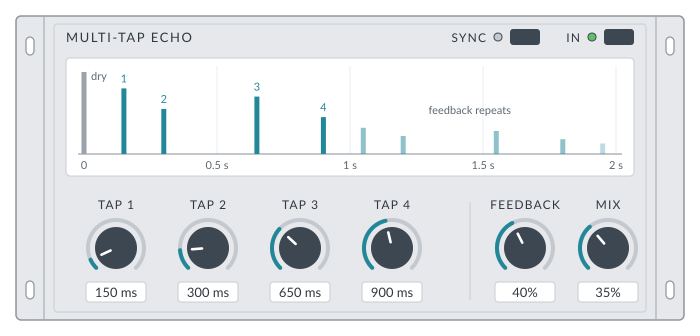
A generic four-tap echo. Each tap's knob sets its delay time, and the height of its bar in the display shows its level. With 40% feedback, the whole pattern repeats every 900 ms, each time 60% quieter, until it dies away.
Controls: echo time (often set separately for left, center and right), feedback (for multiple echoes that die away or build up), mix, pre-delay. Software multi-tap delays may allow syncing taps to the session tempo, and some may provide separate filters for each output channel.
Echo audio examples
Dry signal
Slapback 100 ms, single tap
Mono multi-tap taps at 150, 300, 650 and 900 ms
Stereo echo with feedback 200 ms left, 440 ms right (shortened source)
Flanging and Phasing
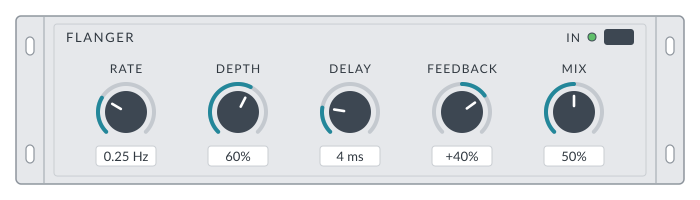
A generic flanger, set for a classic slow sweep: a 4 ms delay swept once every four seconds (0.25 Hz), with 40% feedback to strengthen the comb filter. Feedback is a center-zero control; turning it below zero inverts the fed-back signal.
The flanging effect is created by minutely delaying (1–20 ms) a copy of the input signal and remixing it with the original, creating a classic comb filtering effect. The resulting constructive and destructive interference reinforces varying sets of harmonically related frequencies. As delay time is altered by an LFO, to a degree set by the depth control, it creates the flanger's unique sweeping effect. A flanger is built the same way as the chorus in the diagram above, with a shorter delay and usually more feedback. The effect can be enhanced by feeding back part of the flanged signal into the input again. If the fed-back signal is inverted, the peaks move to a different set of frequencies (the odd harmonics of a pitch an octave lower), giving a hollower sound. The name comes from the original technique: two tape machines played identical copies in sync, and an engineer lightly pressed on the flange (rim) of one machine's reel to slow it slightly, shifting it in time against the other. A type of flanging is called barber-pole or infinite flanging, in which, as the name suggests, the rising or falling harmonic emphasis seems to go on in one direction forever, similar to a Shepard tone.
Controls: rate, depth, delay, feedback, mix, stereo image.
Computed responses: processed and dry signals mixed equally, no feedback, each frozen at one point in its sweep. Frequency is on a linear scale.
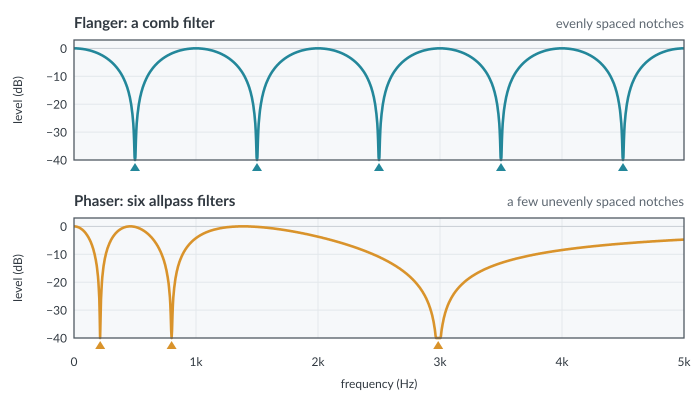
A flanger’s delayed copy cancels the original at evenly spaced frequencies, leaving peaks at whole-number multiples of one frequency (here 1, 2, 3 and 4 kHz, set by a 1 ms delay), which is why its sweep can sound pitched. A phaser produces only a few notches (three here, from six allpass filters), unevenly spaced, so its sweep sounds smoother. As the LFO sweeps, the notches slide up and down the spectrum together.
Phasing, or the phaser effect, is very similar to flanging, except that instead of a delay it uses a chain of allpass filters, which shift the phase of different frequencies by different amounts. Mixed with the original, they produce a handful of notches that are not evenly spaced, so the sweep sounds smoother and less pitched than a flanger's harmonic comb.
Flanger and phaser audio examples
Dry signal guitar
Mild flange
Extreme flange left and right in opposite phase
Phaser with feedback six stages, sweeping across the stereo field
Pitch Shift
A pitch shifter transposes incoming audio, live or recorded, by a musical interval or a frequency ratio, without changing its duration. Some effects provide the ability to mix the original with the shifted material. More sophisticated pitch shifters allow the outgoing signal to be delayed and fed back into the pitch shifter, so each repeat is transposed again, building a cascade of pitches. The last example below uses GRM Tools PitchAccum for that purpose, but you can get the same result by sending the pitch shifter's output to a delay and back into the pitch shifter. Even with the best pitch shifters, the farther away the transposed pitch gets from the original, the more artificial it is likely to sound, particularly with voices, unless the shifter can preserve the formants separately, as more sophisticated phase vocoder applications can.
Pitch shift audio examples
Dry signal
Down an octave 50% mix
Two pitches, delay and feedback GRM Tools PitchAccum
Gate and Reverse Gate
Attack 10 ms, hold 60 ms, release 120 ms.
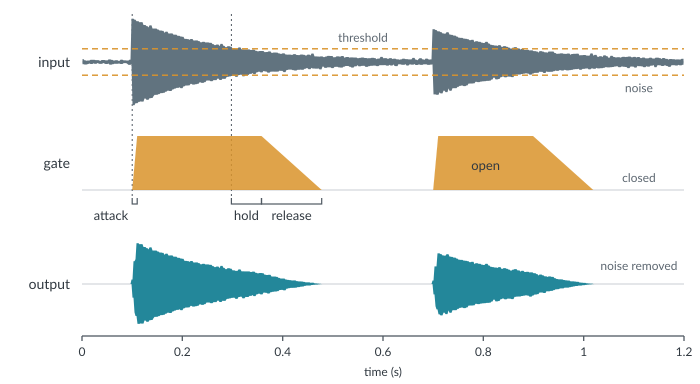
When the input rises above the threshold, the gate opens over the attack time. When it falls back below, the gate stays open for the hold time, then closes over the release time, so the note’s tail fades rather than being cut off. Between notes the gate is closed, and the noise never reaches the output.
A gate lets signal through only while its input is above a set amplitude threshold. What is extremely fun with a gate is to use another signal or even MIDI data as the gating input (often called a key) to let the signal input through, as demonstrated in the audio example below. A gate is good for cleaning up sounds with low-level noise (like tape hiss, if you remember what that was), but it easily leads to an artificial silence between impulses. A reverse gate with certain attack and release settings may make an input signal sound reversed because of the way it reshapes the amplitude envelope. Some plug-ins allow for a specified, repetitive gating rhythm to be overlaid on a signal, often called a pattern gate.
Controls: threshold, attack, hold, release (or decay), smoothing.
Gate audio example
Human speech gated by dog barks the barks are the key input
