Chapter Two: Studio Gear
4. Mixing Consoles | Page 3

The whole strip—
signal flows downward
Input Channel Strips (continued)
3The EQ (Equalization) Section
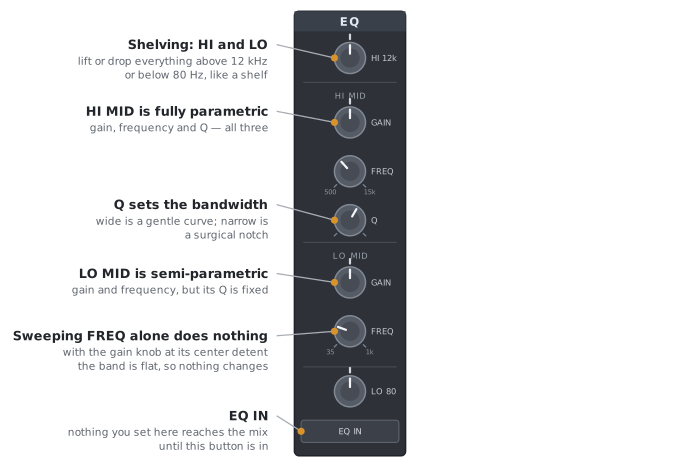
The EQ (equalization) section is used to adjust the amount of boost or cut (attenuation) for high, midrange and low frequency bands (the exact number of frequency bands varies according to the mixing console model). Higher-end mixers, and virtually every DAW EQ plug-in, allow the user to adjust the exact frequency of the bands as well as their boost or cut. For example, on this mixer, notice that the LO MID (range) section allows adjustment of the center frequency (lower pot) as well as the amount of boost or cut (upper pot). This is called a semi-parametric (or swept) EQ. A common novice mistake is to twirl the lower knob while leaving the upper knob set to zero, which will do absolutely nothing to the sound, since you are neither boosting nor cutting the frequency band.
The HI MID (range) section of this mixer adds a third control (lowest knob) to the boost/cut and center frequency, namely the bandwidth of this band, labeled Q here and marked in octaves on some other consoles—the two run inversely, so a wide band in octaves is a low Q and a narrow one a high Q. Neither the lowest nor the highest band has an adjustable frequency—only the amount of boost or cut. Both the HI MID and LO MID are peak/notch filters, but only the HI MID, with its Q control, is fully parametric.
The Hi and LO EQ use shelving filters, meaning that they boost or cut most frequencies above 12 kHz (Hi) or below 80 Hz (Lo) equally (picture a horizontal shelf moving up or down without tilting) with a gentle transition slope rather than an abrupt cutoff.
The high-pass or rumble filter we met in the preamp section—which removes the low-frequency energy caused by vibrations on a mic stand, foot tapping, HVAC and the like—is grouped with the EQ on many consoles, where it is usually labeled LOW CUT. Corner frequencies vary, 75 to 100 Hz being typical, as does the steepness of the rolloff, commonly 12 or 18 dB per octave. Finally, be sure to engage the EQ IN button if you wish your EQ settings to have any effect. Toggling this button is a good way to ascertain the effect of your EQ on the sound vs. the original signal.
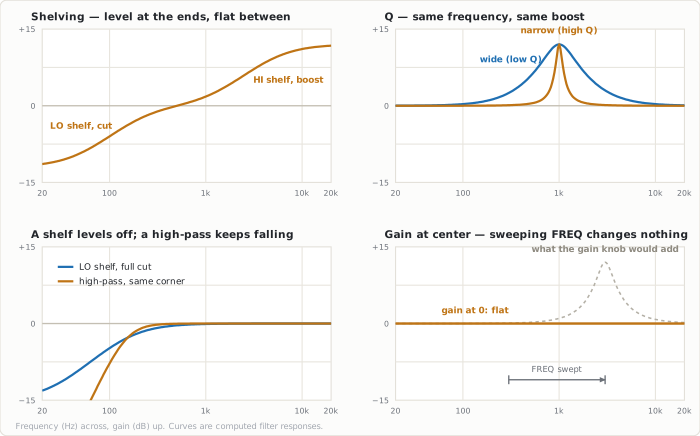
What the knobs actually do to the sound. A shelf levels off and stays there; a high‑pass keeps falling. Q sets how wide the affected band is, not how much is added. And at bottom right, the novice mistake: with gain at its center detent the response is flat, so sweeping FREQ moves a bump that has no height.
With the exception of live sound reinforcement and tracking through a console, most of the EQ you do will not happen on a console at all. In a DAW, equalization arrives as a plug-in on each track, and although the interface looks nothing like a channel strip, the controls are the ones you have just met: a frequency, an amount of boost or cut, and for the mid bands a bandwidth. What the plug-in adds is quantity and flexibility—typically six or eight bands rather than four, each one fully parametric, and usually switchable between bell, shelf and high- or low-pass shapes. You are no longer limited to the bands the board happens to have, and the settings save with the session and come back exactly as you left them, which no analog board can do.
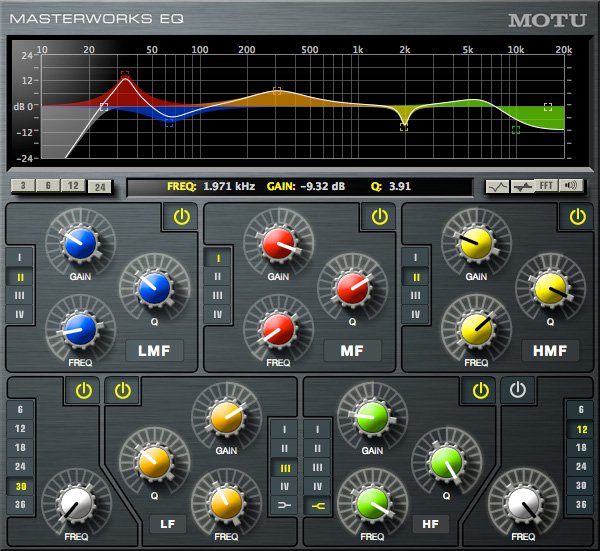
MOTU's MasterWorks EQ, the equalizer built into Digital Performer: seven filters in all—five bands with their own GAIN, FREQ and Q, plus high- and low-pass filters at either end whose slopes step from 6 to 36 dB per octave. Each filter draws its own curve in its own color, and the readout reports the selected one exactly: here a 9.32 dB cut at 1.971 kHz with a Q of 3.91, which is almost precisely the narrow curve in the second panel of the figure above, inverted into a cut. The FFT button puts a live spectrum behind the curves. Screen shot from MOTU's MasterWorks EQ product page.
They also add something no analog strip can: a picture of what you are doing. An EQ curve display draws the shape of the filter across the frequency range, so a shelf really does look like a shelf and a high-Q mid band really does look like a spike. Many also lay a live spectrum analyzer behind that curve, showing which frequencies are actually present in the signal—the curve is what you are doing to the sound, the spectrum is what is there to work with. On most of these you drag a point on the curve rather than turning a knob. It also makes the novice mistake obvious at a glance: with no boost or cut dialed in, there is simply nothing on the screen to move.
As a general practice, equalize tracks separately before mixing down a multitrack recording. One caution, however, is that boosting or cutting frequencies will cause the input balances to change. Extreme boosting of frequencies, particularly in the low band, may cause a channel to distort, since it may add as much as 15 dB, a factor of 32 in power.
Finally, your ears are your best guide, but there are many, many tips on EQ out there on the web. While some are geared more towards a pop sound, even then you may get some good pointers. And be creative with EQ—we mentioned earlier the idea of putting different EQ settings on your returning effects signals.
